Adding Items to the Oil Rig Manufacturing Terminal
Info
This system was introduced in America Rising 2 - Legacy of the Enclave Version 1.1.0 and will not work on older versions of the mod.
Introduction
Once the player has restarted the Oil Rig’s factory during Humanity Must Shape Their Tools, they get access to the factory’s Special Orders functionality in the Production Terminal.
The player can use Special Orders to exchange Enclave Requisitions (a reward they earn by completing repeatable quests) for any piece of Enclave Equipment.
Modders can add to the pieces of equipment that can be produced by using a template script that is included with America Rising 2 version 1.1.0.
How It Works
Controller Quest
The Special Orders terminal entry is driven by a controller quest named AR_EnclaveOilRigProductionSystem - this controller quest holds 4 lists:
- Weapons
- Armors
- Clothing
- Ammunition
These lists correspond with the sub-categories within the Special Orders entry, although it’s worth noting they don’t strictly hold what their names suggest. That is to say, there’s nothing stopping you from adding Armor to the Weapons category.
Manufacturing Terminal
The Special Orders terminal entry within the Manufacturing Terminal is dynamically populated with the contents of the list you have selected to view. It shows up to 10 items at once, with buttons to go between pages if there are more than 10 items in a list.
As the entries are dynamic, direct edits to the Manufacturing Terminal will never be necessary.
Adding Items to Special Orders
Warning
This guide will assume you are using the Fallout 4 Creation Kit and have basic knowledge with it, as you will need to work with Papyrus Script Properties to add new items to the terminal.
Plugin Choice
Adding new items to the terminal can be done in a new plugin, or if you have made (or are making) Enclave ECS loadout addons you can use your addon plugin - whatever you prefer. For instance, if you’re making a patch to replace the Enclave’s X-01 Power Armor with Enclave X-02 Power Armor, you could also add the Enclave X-02 Power Armor to the terminal in the same patch.
Creating the Injection Quest
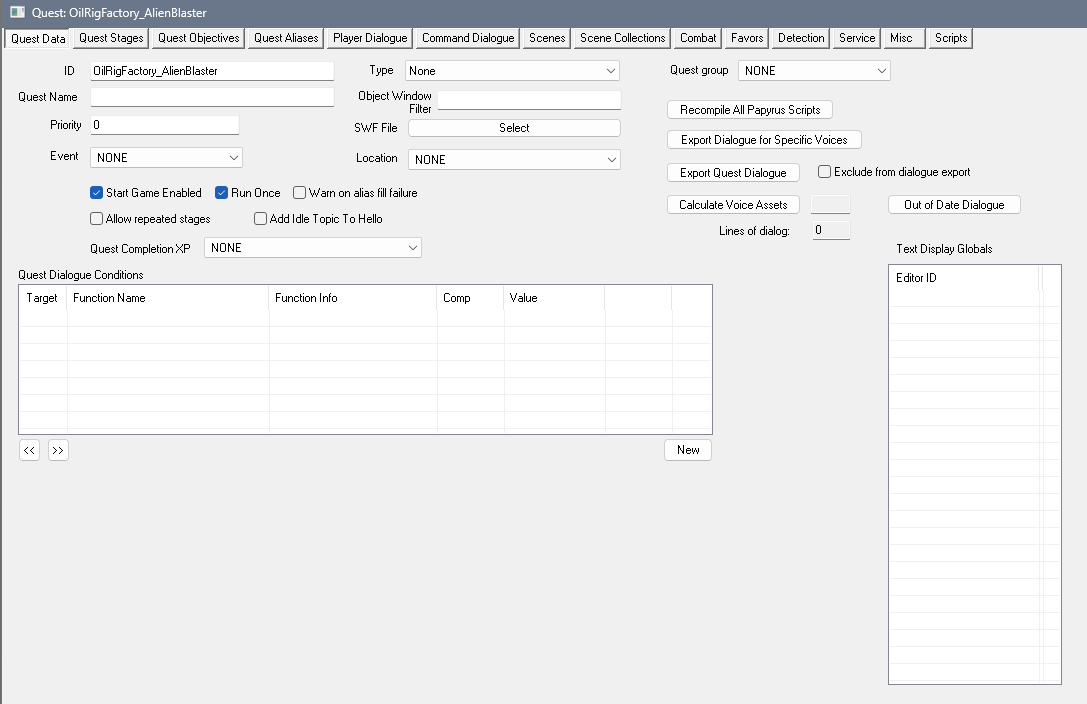
I’ve included a script with America Rising 2’s 1.1.0 update that will handle the injection logic - you just need to create a Quest form that will hold the script. Create it and name it something appropriate - in this example we’ll be injecting the Alien Blaster into the Special Orders Terminal, so we’ll name it OilRigFactory_AlienBlaster. Once you’ve created your quest form, press “Ok” to close the window, and then re-open it. This is to allow the Creation Kit to properly initialize all the fields available to the quest.
Ensure the following is set on your quest’s Quest Data tab:
- ID: The quest ID you gave it (in this case OilRigFactory_AlienBlaster)
- Type: None
- Quest Name: Whatever you want - this will not be shown ingame
- Priority: 0
- Event: None
- Start Game Enabled: Ticked
- Run Once: Ticked
- Quest Completion XP: None
Configuring Item Injection
Script
Go to your quest’s Scripts tab at the very right - click “Add” and add the following script to your quest: AR_EnclaveProductionInjectionScript. Once you add it, the Properties window for the script will open up. If not, left-click on the script and click the Properties button below the Add button.
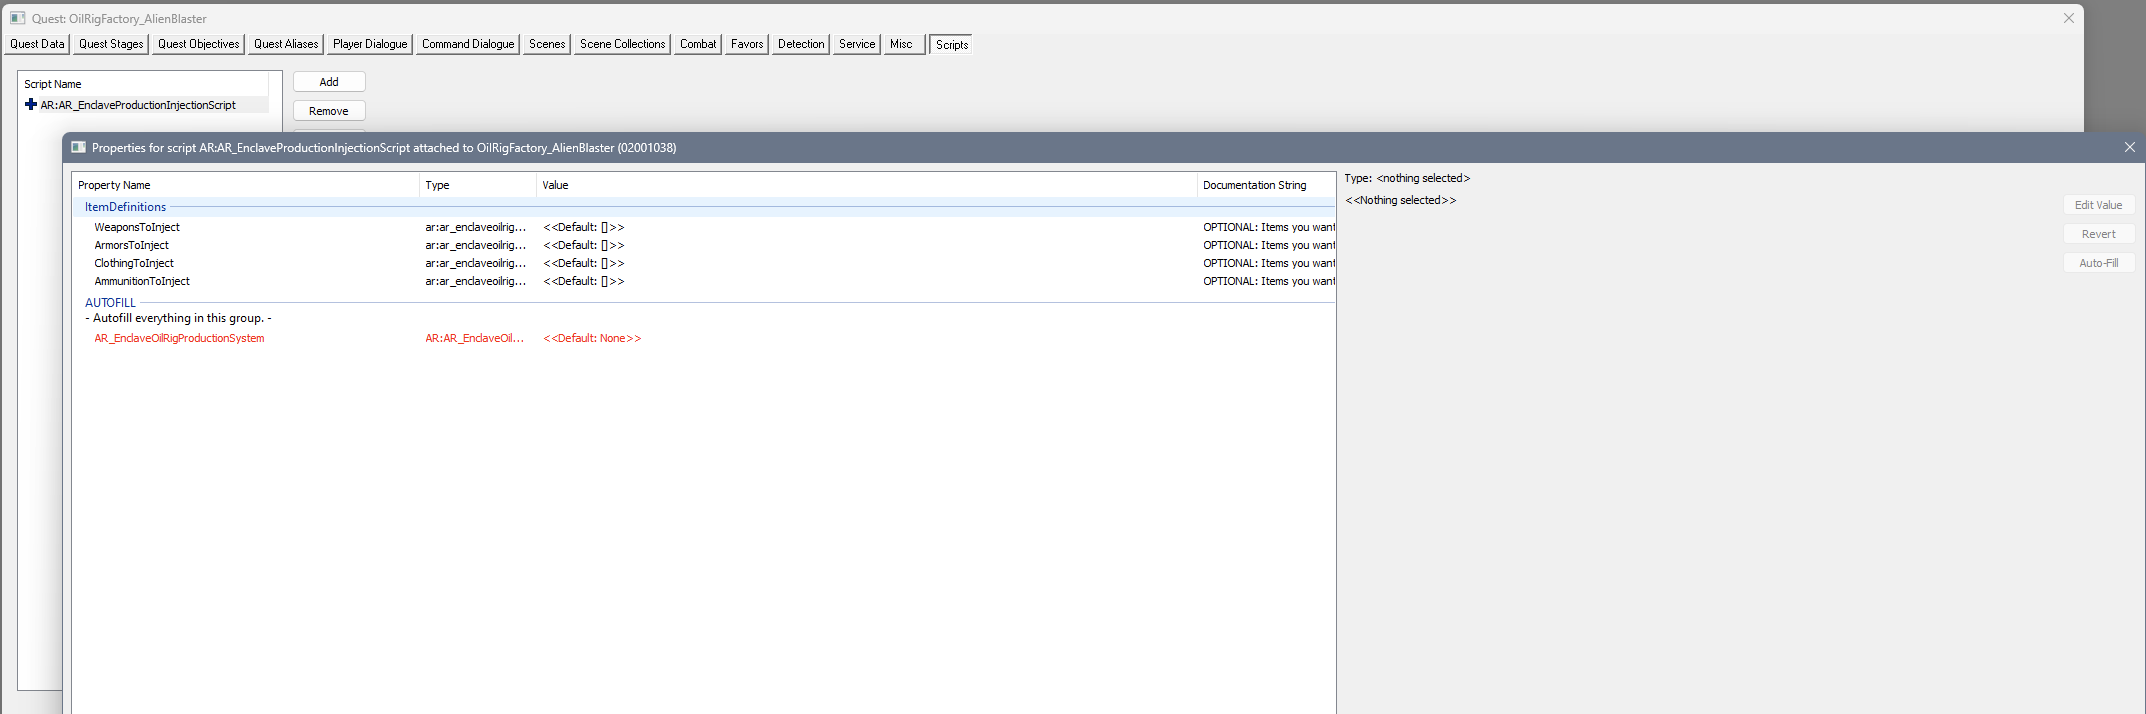
Firstly, you’ll want to click the Auto-Fill All button at the bottom-left of the Properties window. This will ensure the script correctly references the Production System Controller Quest. Without this, your item injection will not work.
You’ll also see the following under the ItemDefinitions header:
- WeaponsToInject
- ArmorsToInject
- ClothingToInject
- AmmunitionToInject
These correspond to the different sections in the Special Orders terminal, and are all empty to begin with. You can fill all of them, or just one of them - it comes down to what you’re wanting to add.
Defining your Items
To define which items you want to add to the Special Orders terminal, you’ll want to open up one of the lists you want to add to. Sticking with our example of adding the Alien Blaster, we’ll open up the WeaponsToInject list by left-clicking on it, and left-clicking the Edit Value button to the right. Then, left-click the Add button (where Edit Value originally was) to add a new item definition.
Tip
You can add as many items in a section as you want. You could add 5 new weapons by clicking “Add” 5 times and defining each one - we’ll just keep things simple for this guide.
Once you’ve clicked Add, a new window will pop up. This window is where you actually define the item you want to add to the Special Orders terminal. To specify the data, select each field and click the “Edit Value” button. Not all fields are mandatory. The fields are:
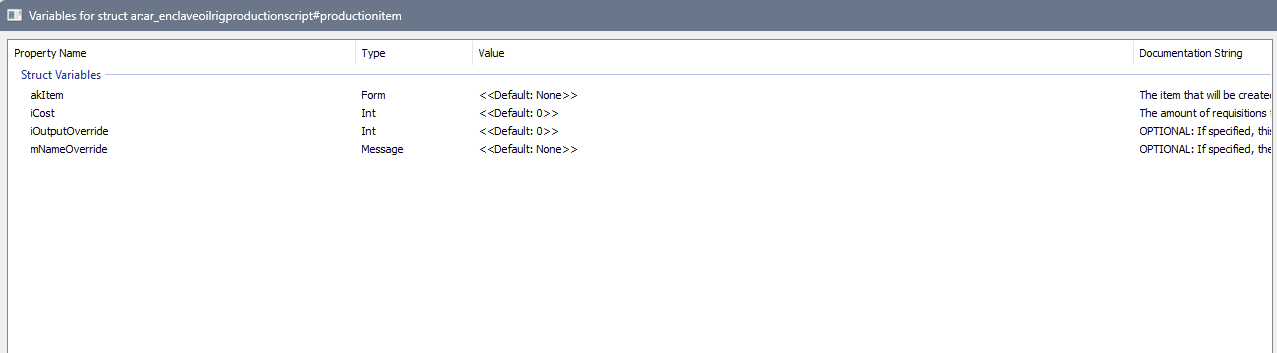
- akItem: Mandatory - this is the actual item you want to make available. In our case, we’ll select the Form Type of Weapon, and for Pick Object we’ll select AlienBlaster.
- iCost: Mandatory - this is how many requisitions we want the Alien Blaster to cost. Keep in mind that the higher the cost, the longer it takes to produce the item in the factory. We’ll make it 5 for our example.
- iOutputOverride: Optional - this is how many items will be created when you select the Alien Blaster in the terminal. If you leave it unspecified, it’ll default to 1. If you made it 15, then 15 Alien Blasters will be made at a time. We’ll leave this as-is for our example.
- mNameOverride: Optional - this is the name that will show up in the Special Orders terminal for the item. If you leave it empty, it’ll just use the item’s actual name. Specify this if you want it to use an alternate name instead. These must be a Message, with the name contained in the Message’s Title (Look at the AR_EnclaveOilRigProductionName_EnclaveCombatArmorHeavyMsg message for an example if you’re interested). We’ll leave this as-is for our example.
Click OK to confirm your item definition - and your Properties window should look identical to the one pictured, with one item in WeaponsToInject and AR_EnclaveOilRigProductionSystem correctly referenced under the AUTOFILL section.
If so, you’re done!
Conclusion
That’s everything you need to know about adding new items to the Oil Rig Special Orders terminal. Once you gain access to it after Humanity Must Shape Their Tools, you should find the items you’ve defined available for production.
If you added an item from a mod, it’s worth noting that the terminal will automatically clean up any bad/broken references every time you load your game, so if said mod was uninstalled then the item will automatically be deleted from the terminal.

Completed Plugin